By: Iggy Silva
Table of Contents
- Functionality Features
- Set-up of Mobile Device
- Set-up Work Templates
- Set up Location Directives for the “License Plate Guided” Strategy
- Set up “Process Warehouse App Events” Batch Job
- Set up “Automatic Release of Transfer Orders” Batch Job
- Set up “Process Outbound Shipment” Batch Job
- Create and Process Transfer Orders from the Warehouse App
Many organizations leverage transfer orders to move materials between warehouses within a single legal entity. Until recently, the initiation of these transfer orders could be managed solely from within the Microsoft Dynamics 365 Supply Chain Management client. A new feature has recently been made available that extends this feature to the Warehouse Management application.
With this new functionality, many businesses that use the transfer order function will improve their shipping efficiency by utilizing this predominantly automated process. Below we dive into a handful of use cases where this functionality can be hugely beneficial to the warehouse team.
This new feature will allow businesses to pick straight from the end of a production line to a trailer for delivery. There is no need to move inventory to a warehouse location to wait for a full load of pallets to be ready. This means that in high-moving warehouses where orders are made and shipped immediately, companies can move inventory as it is being produced. This will lead to less downtime between production and shipping.
Many warehouses tend to have a work shift where a manager is not physically present at the facility. If there is an emergency in which a truck needs to be loaded, but there is no one available to create work in D365, this feature can save companies from paying driver fees due to a delay. This functionality will allow users to pick the specific items required for the truck, straight from inventory, without the need for existing work. Once they pick the items and complete the transaction, the automation kicks in to create the order, complete the job, and confirm the shipment without anyone having to access the system.
Functionality Features
The first step to creating a transfer order from the mobile device will be to turn on some features that allow the functionality to work. This way, you can:
- Process warehouse app events
- Create and process transfer orders from the warehouse app
- Confirm outbound shipments from batch jobs
- Organization-wide work blocking
- Deferred put operations
- Deferred processing of manual inventory movement operation
Set-Up of Mobile Device
Below, we’ve added some steps to help you set up your mobile device. This will allow you to create and select the mobile menu item when logged in.
- Navigate to: Warehouse management > Setup > Mobile Device > Mobile Device Menu Items
- Create a new mobile device menu item: Select “New” on the action pane
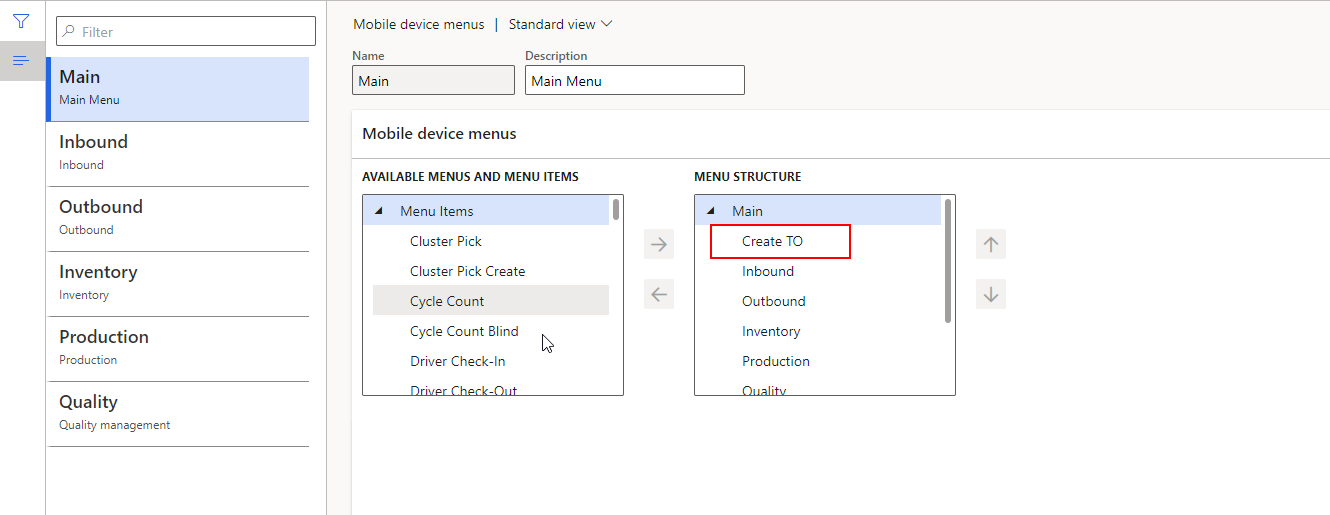
- Create a menu name: Enter the name you would like to see on the mobile device—we’ve utilized “Create TO”
- Create a title: Enter a description here for the menu item—we’ve utilized “Create Transfer Order”
- Mode: Indirect
- Activity Code: Create transfer order from license plates
- Transfer order line creation policy: License plate guided with line reservation
- Outbound shipment policy: Release and ship confirm
- This will allow the user to have the transfer order released to the warehouse and confirm the shipment. This would be recommended unless those two processes are split up for your specific business processes. In that instance, you can choose to select ‘Release to Warehouse’, which will release and complete the work without confirming the shipment.

- Navigate to: Warehouse Management > Setup > Mobile Device > Mobile Device Menu Item
- Add the created Item: Add the item to the menu structure you have decided fits best for your business
- We have selected to put it in the “Main” menu structure
Set-Up Work Templates
Setting up a work template will automatically process the work that is created when the wave is released. It is worth noting that when license plates are utilized, typically you are not able to process work automatically. But don’t worry—Microsoft has finally made it possible through this process. Here’s how to set up work templates:
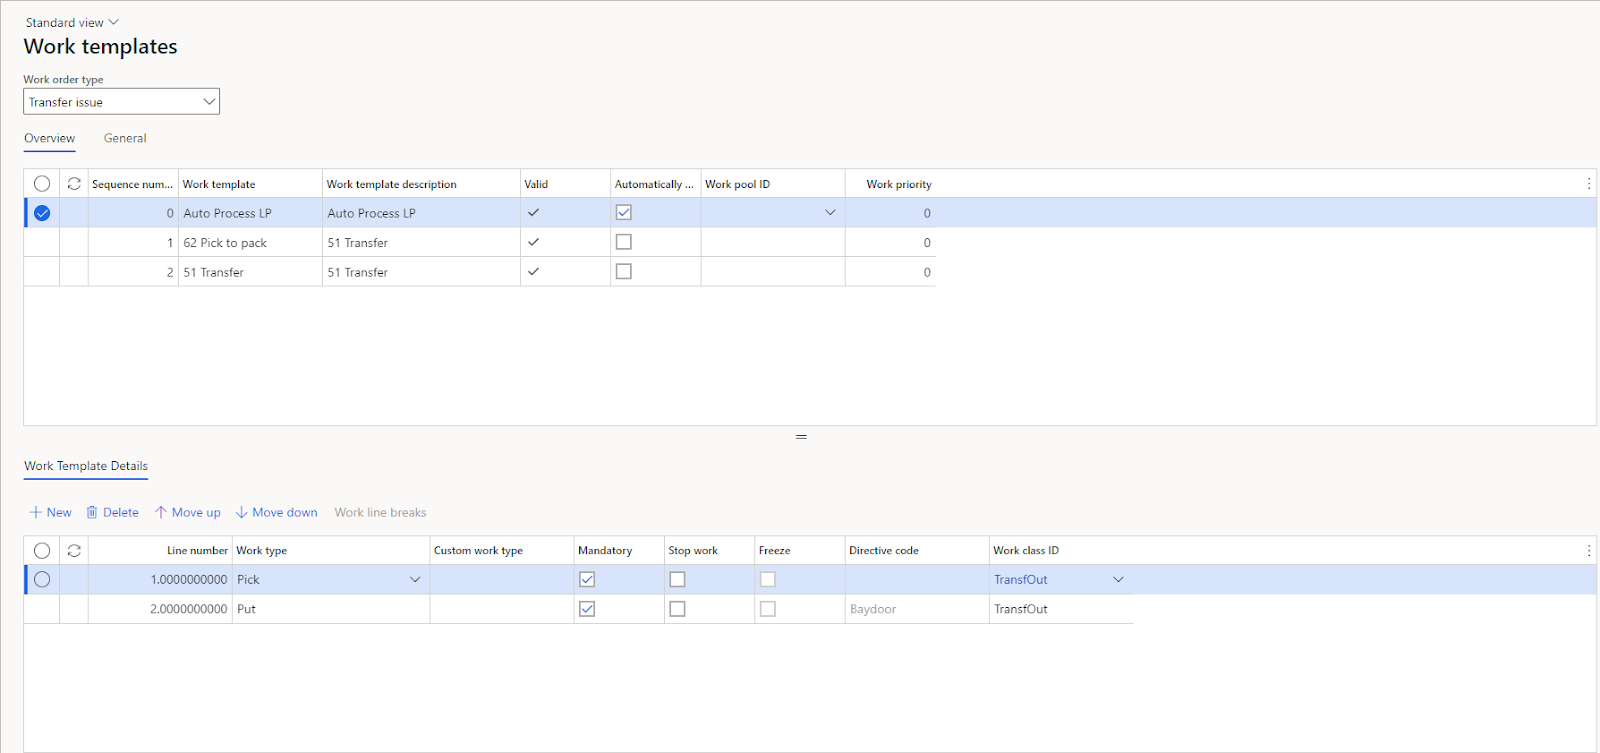
- Navigate to: Warehouse Management > Setup > Work > Work Templates
- Set the work order type to: Transfer Issue
- On the Action Pane, select “New” to create a new work template:
- Sequence Number: 0
- Since we will be creating specific queries for this work template, we recommend making this template the first in your sequence.
- Work Template: Enter a work template name—we have used “Auto Process LP”
- Work Template Description: Enter a work template description—we have used “Auto Process LP”
- Automatically Process: Select this checkbox
- On the action pane, select ‘“Save”
- This will allow you to edit the work template details below
- With the new template selected, go to “Work Template Details,” and select “New” from the toolbar to add a new line and select:
- Work Type: Pick
- Work Class ID: TransfOut
- Add a second line and select:
- Work Type: Put
- Directive code: Baydoor
- Work Class ID: TransfOut
- Edit the Sequence Number in the overview table:
- Sequence Number: 0
- Since we will be creating specific queries for this work template, we recommend making this template the first in your sequence
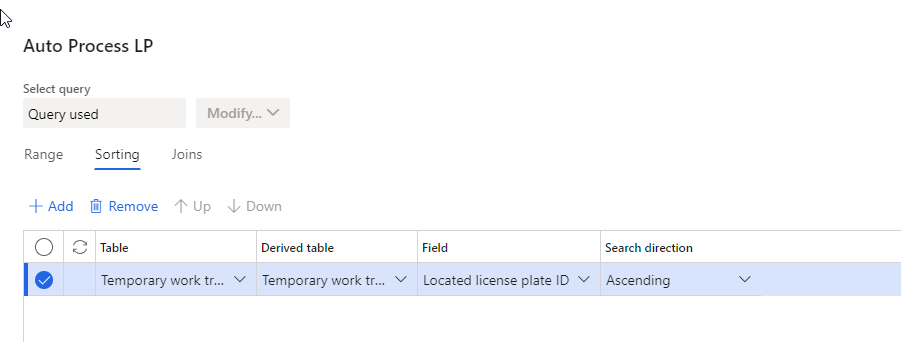
- With the new template selected, select “Edit Query” on the action pane
- Open the Sorting Tab in the dialog box
- Select “Add”
- From the “Field” column select: “Located License Plate ID”
- The column “Search Direction” will populate to “Ascending,” or can be changed to “Descending,” depending on your business needs.
- Select “Ok” and then select “Yes” when asked to reset your grouping
- On the action pane, select “Work Header Breaks” and then select the “Group by this Field” check box

Set Up Location Directives for the “License Plate Guided” Strategy
Setting up directives will show you how to enable the “License Plate Guided” strategy on your existing location directives. Below, we’ve included the step-by-step instructions:
- Navigate to: Warehouse Management > Setup > Location Directives
- On the list pane, select the “Work Order Type” dropdown and select “Transfer Issue”

- Select the location directive you will be utilizing, for this exercise, we have selected “51 TO Pick”
- In the “Lines” FastTab select to enable the “Allow Split” check box
- In the “Location Directive Actions” change the current strategy to “License Plate Guided”
- If you have multiple “Location Directive Actions,” then make the one that is “License Plate Guided” the lowest “Sequence Number” so it is acted on first by the system

Set Up “Process Warehouse App Events” Batch Job
Setting up the “Process Warehouse App Events” batch job will allow you to create the transfer order once the items have been picked, and update the transfer order lines after it’s been created. Here’s how:
- Navigate to: Warehouse Management > Periodic Tasks > Process Warehouse App Events
- Expand “Run in Background” FastTab
- Set “Batch Processing” to “Yes”
- Select “Recurrence,” which will open the “Define Recurrence” form
- This is where you can make a batch job reoccur on a schedule, so it is automatically processed based on the schedule parameters you’ve selected.
- Set the batch job to run for the needs of your business
- For the create transfer order function: if your business typically loads items and has them shipped and confirmed quickly then we recommend having the recurrence pattern at 5 minutes or less.
- Select “Ok” to return to the “Process Warehouse App Events” form
- Select “Ok” to add the batch job to the batch queue
Set Up the “Automatic Release of Transfer Orders” Batch Job
Setting up the “Automatic Release of Transfer Orders” batch job is how the system creates the transfer order in the “All Transfer Orders” form once the order has been marked “Ready to Release” in the “Warehouse App Events” form. Here’s a breakdown of the process:
- Navigate to: Warehouse Management > Release to Warehouse > Automatic Release of Transfer Orders’
- Expand the “Records to Include” FastTab and select “Filter”
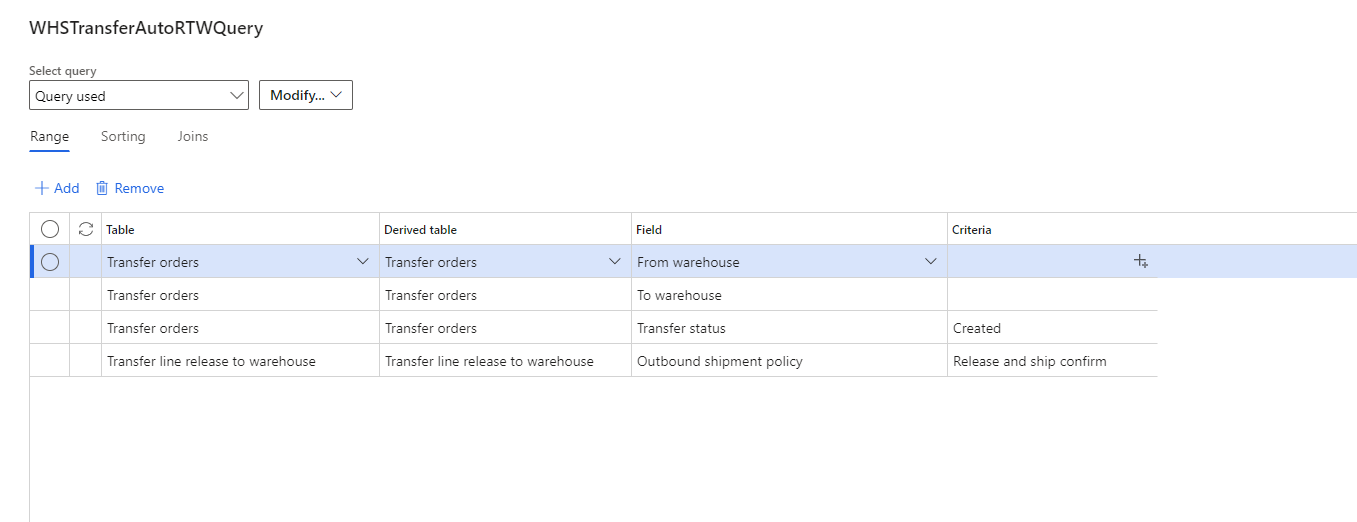
- On the “Range” tab, select “Add” to add a new row to the form with the following settings:
- Table: Transfer line release to warehouse
- Field: Outbound shipment policy
- Criteria: Release and ship confirm
- Select “Ok” to be taken back to the “Automatic Release of Transfer Orders” form
- Expand the “Run in the Background” FastTab, then select “Yes” for “Batch Processing”
- Select “Recurrence,” which will open the “Define Recurrence” form
- This is where you can make a batch job reoccur on a schedule so that it is automatically processed based on the schedule parameters you’ve selected.
- Set the batch job to run for the needs of your business.
- Select “Ok” to return to the “Automatic Release of Transfer Orders” form
- Select “Ok” to add the batch job to the batch queue
Set Up the “Process Outbound Shipment” Batch Job
In this section, we’ll teach you how to create a scheduled batch job for the “Process Outbound Shipment” batch job. This batch job will confirm the loads for orders that are marked as “ready to ship” on the transfer order.
- Navigate to: Warehouse Management > Periodic Tasks > Process Outbound Shipments
- Expand the “Records to Include” FastTab
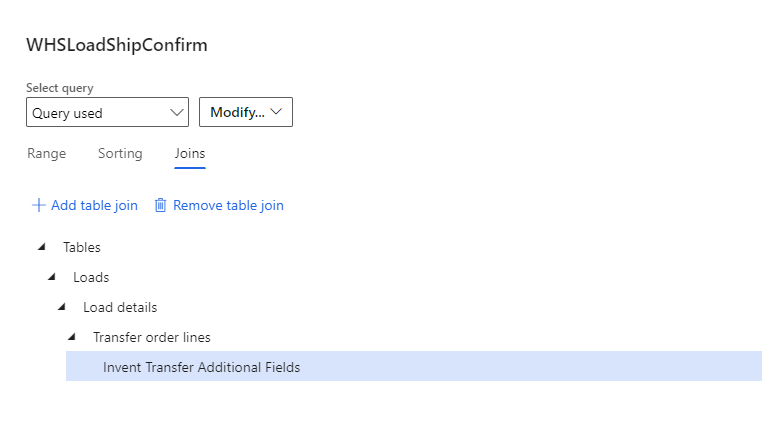
- Open the “Joins” tab
- Select “Loads” from the hierarchy list
- Select “Add a Table Join” and find “Load Details (Load ID)” in the “Relation” column, then click the “Select” button to add the join
Use the same process to add the “Transfer Order Lines” and “Invent Transfer Additional Fields” relations.
- Select the “Range” tab and add the following rows:
- First Row
- Table: Loads
- Field: Load Status
- Criteria: Loaded
- Second Row
- Table: Invent Transfer Additional Fields
- Field: Outbound Shipment Policy
- Criteria: Release and Ship Confirm

- Expand the “Run in the Background” FastTab, select “Yes” for “Batch Processing”
- Select “Recurrence,” which will open the “Define Recurrence” form
- This is where you can make a batch job reoccur on a schedule so that it is automatically processed based on the schedule parameters you’ve selected.
- Set the batch job to run for the needs of your business.
- Select “Ok” to return to the “Confirm Shipment” form
- Select “Ok” to add the batch job to the batch queue
Create and Process Transfer Orders from the Warehouse App
- Open the warehouse App: Sign into Warehouse 51
- Select the menu item “Create TO”
- Select the warehouse that you will be sending the order to, for this example we’ve selected warehouse 61
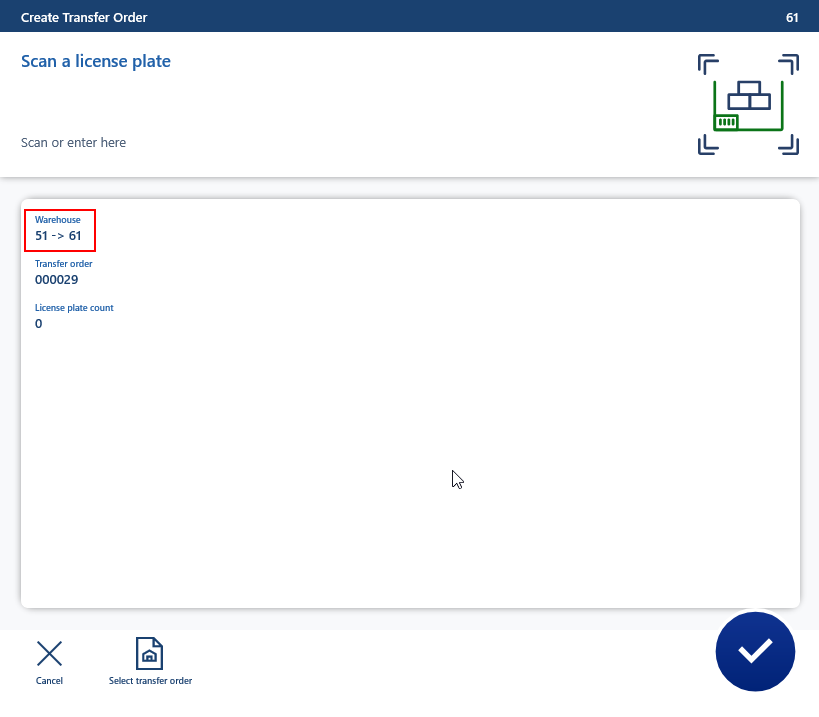
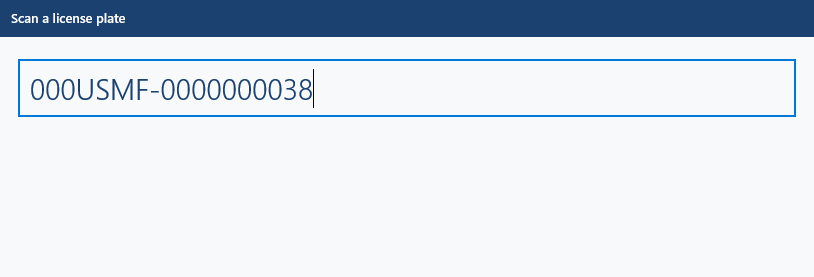
- Scan an available license plate in inventory that is not already reserved
- Once you scan, you will notice the LP count goes up
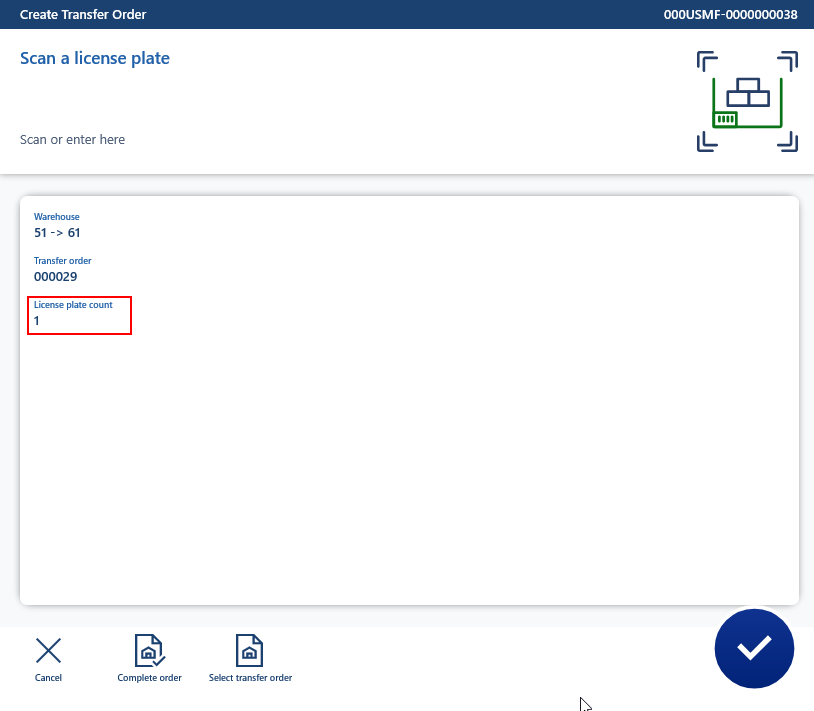
- Navigate to: Warehouse Management > Inquiries and Reports > Mobile Device Logs > Warehouse App Events
- You’ll notice there is an event for the transfer order you have begun and is in the “Waiting” state

-
- Open the menu item and select “Complete Order”
Note: Everything that happens after this step should happen automatically and will occur based on the timing of the recurrence interval set up on the batch jobs created above.
- This will change the event state to “Queued”
- This will also create a second line with the event type “Complete Transfer Order”

- The “Process Warehouse App Events” batch job will run
- It will first change the ‘Create Transfer Order’ event state to “Completed”
- Then the batch will run a second time and complete the event type “Complete Transfer Order”
- A transfer order will be created when this happens, and the lines will be removed from the “Warehouse App Events” form.

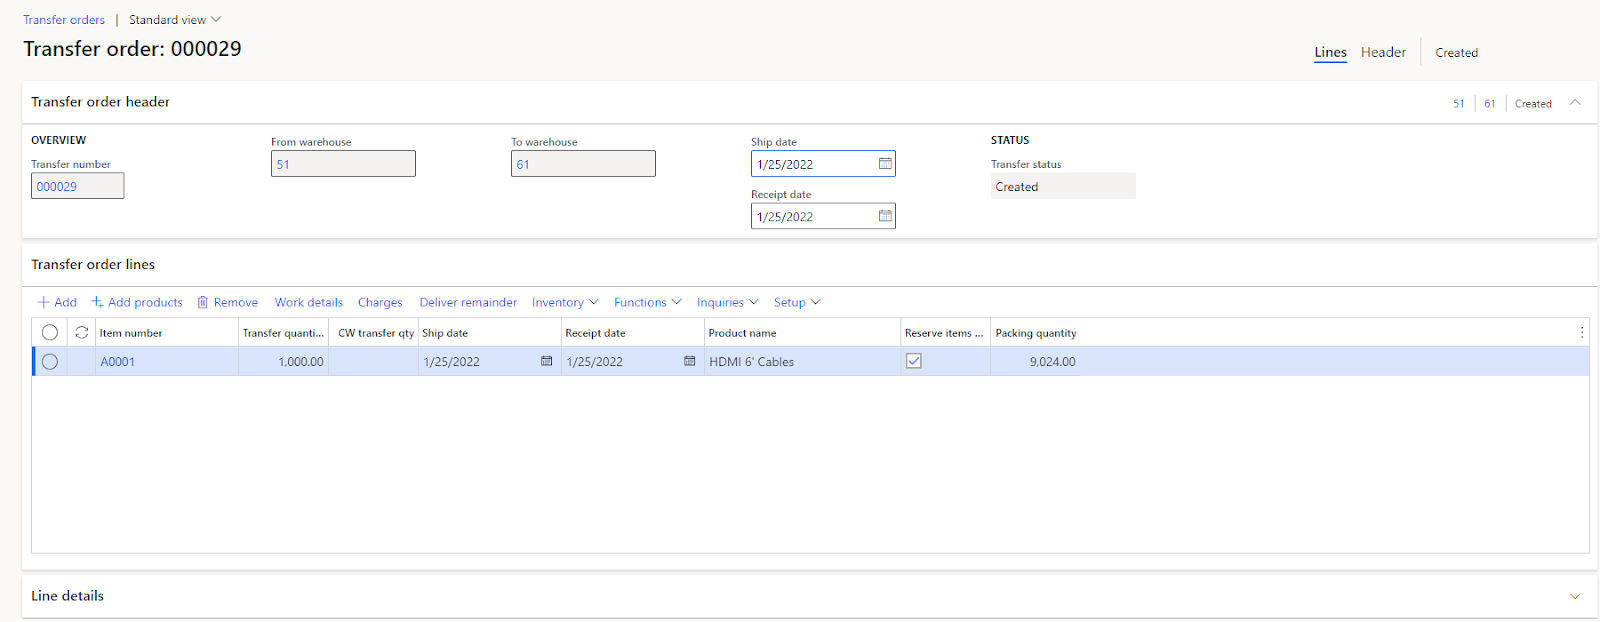
- When the Transfer Order is first created the line details will show an “Outbound Shipment Policy” status of “None”
- This status will then trigger the “Automatic Release of Transfer Orders”

Once the transfer order is released the “Outbound Shipment Policy” will change to a status of “Release and Ship Confirm”

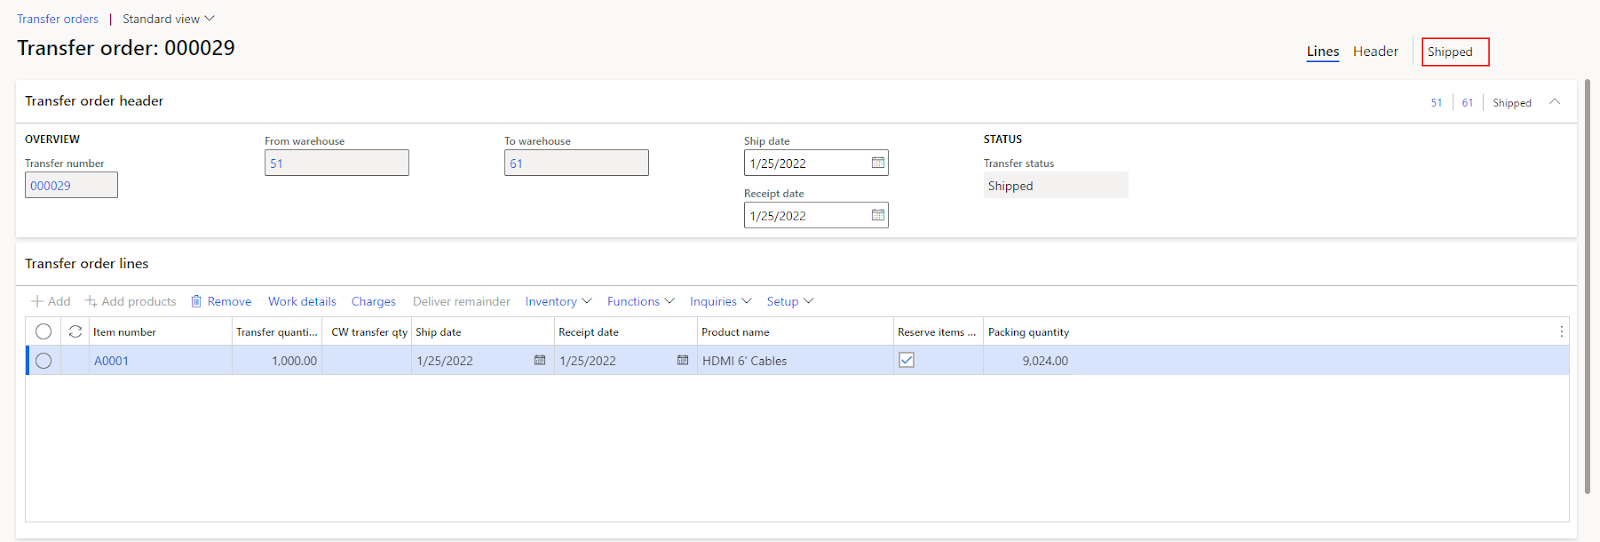
Next, you will see that the shipment has been created, the load has been created, the work has been created, and the work has been completed.

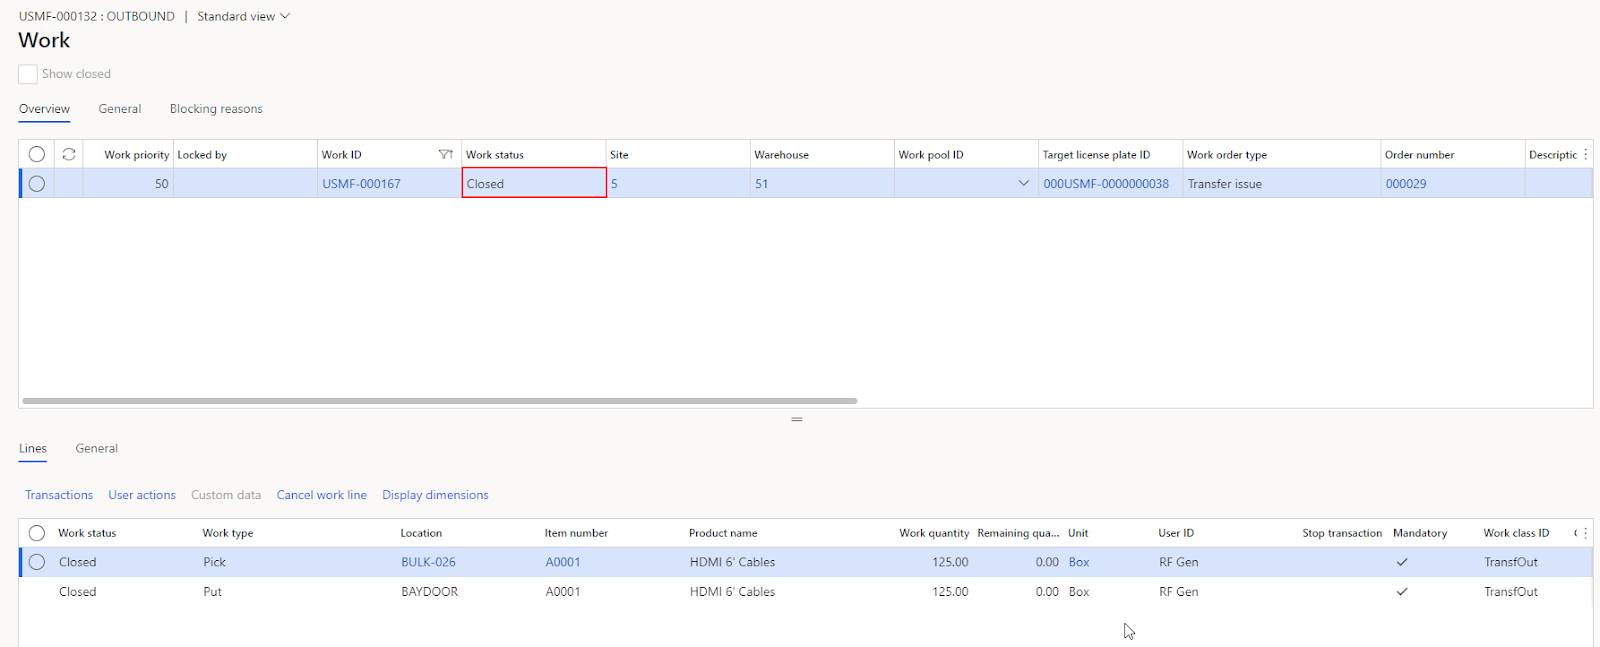
The final step is waiting for the “Process Outbound Shipment” batch job that will confirm the shipment and change the load status to “Shipped”

